
|
Most of what is here we learned by reading buildingscience.com or by asking questions at greenbuildingadvisor.com. If there is a mistake don't blame them it's likely our fault. |
Wall upgrades
Exterior view of original wall
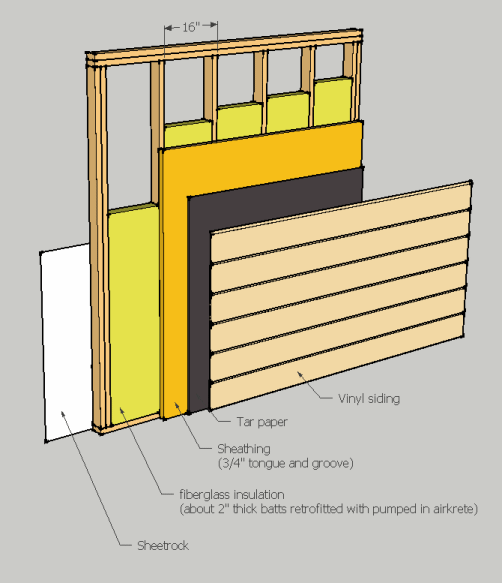
The original wallThe walls are typical 2x4" construction. Since this house was built back in 1960 the level of insulation was poor, when we cut open the sheet rock we found 2" thick insulation in a 3.5" cavity. We guess that we should have been lucky to have any! Actually having no insulation would have made it easier to have retrofitted blown-in cellulose (recycled paper) insulation, because the fiber glass batts obstruct blown-in cellulose. We asked about 5 insulation contractors and they all said it would be hard to do a good job with cellulose because of the existing batts. So we had Federal Conservation pump in Air Krete. Because it is pumped in liquid form it gets into all the gaps, and works it way past any obstructions, it also helps with air sealing. This trouble is that we still only have a 4" thick wall, and that can only provide so much insulation!
QUESTION>: From the outside: One method to up rate walls is to fit XPS on the outside of the walls under the vinyl siding. However, this was not a good solution because there was not enough roof overhang, and it would require all the exterior window trim to be redone, and it would require the vinyl siding on the adjoining wall to be extended (by 1" for every 1" of additional wall thickness). Also the walls have kraft faced vapor barrier on the inside wall, so fitting low permeability insulation on the outside like 2" or 4" of XPS would risk trapping moisture in the wall. If we were replacing the siding anyway this would have been a better option. From the inside: thickening the walls from the inside has problems with mess, interior finish, relocating electrical boxes, extending window openings. When done one room at a time mess is manageable, the interior needed redecorating anyway, and having deeper set windows would make fitting our favorite window treatments easier.
ANSWER>: The upgrade described below lends itself to doing one room at a time without gutting the house or renting any special equipment. |
|
Interior view of retrofitted wall

Our plan - a double stud wallLeave the existing sheet rock in place (less mess and trash and more thermal mass) but cut 2" holes in it to ensure that the kraft paper vapor barrier is torn (potentially we could fill the holes with 2" round pieces of EPS). Then fit 2" of rigid insulating board. Ideally fiber faced polyisocyanurate with all joints taped with aluminum HVAC tape. Any electrical boxes will have to be relocated. Next is an interior 2x4 stud wall with studs aligned 24" on center at convenient points for sheet rock and windows. Potentially 2x3 studs could be used, but they are not much cheaper and 2x4 makes fitting the batts easier. Fill the voids with recycled cotton batts (no itching or formaldehyde). Then 1/2" fiber glass faced sheet rock. This will add about R23 to the existing R9 wall (R32). The interior wall frame is built either 3/4" or 1" shorter than the existing gap between floor and ceiling. This allows the frame to be more easily raised without gouging the ceiling. After the frame is raised a strip of XPS is fitted between the ceiling and the frame. The interior wall frame is built either 3/4" or 1" shorter than the existing gap between floor and ceiling. This allows the frame to be more easily raised without gouging the ceiling, a strip of XPS is fitted between the ceiling and the frame after the frame is raised. In some cases the existing wall finish not sheet rock but is very thin and ugly wooden wall board. Where wall board has been used it will be removed and the kraft facing of the existing fiberglass will be slashed with a box cutter. |

Condensation risk assessmentIt is important that condensation does not occur inside the wall because this can lead to mold, rot, and complete wall failure. The climate here on Long Island is primarily a heating climate, but it can get hot and humid in summer. It is in DoE climate zone 5, it is cold in winter but borders on a mixed/humid climate (DoE zone 4) in summer. So let's consider some worst case scenarios for this climate. In simple terms ignoring thermal bridging the total wall R value is about R36. The condensation plane will be the first surface moving warm to cold at which vapor movement is retarded and the temperature is below the air dew point. Vapor will naturally move from high to low concentration, just as water flows from high to low pressure, or current flows from high voltage to low voltage. Warm air is able to hold more water vapor so it has higher vapor concentration. This is why water vapor moves from the warm to the cold side of a wall. We will use the average low temperature for the coldest month in winter, and the average high temperature for the hottest month in summer. Since the wall has some drying ability using the record low or high values is unnecessary because condensation under record conditions will soon dry out. In summer the potential condensation plane will be the outer edge of the rigid foam board. The worst case is July with an average high temperate 83F with average high relative humidity about 80%. If the summer inside temperature is maintained at 74F then the interpolated temperature at the outer edge of rigid foam board will be 80F which is above the dew point at 78F. So condensation will not occur and the water remains as vapor.
math: 83F - (R13/R36) x ( 83F - 74F ) = 80F In winter the potential condensation plane will be the inner edge of the rigid foam board. The worst case is January with an average low temperate of 23F. Let's assume that we have some house plants or a humidifier to deliberately raise the humidity level to 40% or even 50%. Interpolating, the temperature at the inner edge of rigid foam board will be 53F. The dew point for 70F air at 50% RH is 50F. So the condensation plane remains above the dew point and no condensation occurs. math: 70F - (R13/R36) x ( 70F - 23F ) = 53F We have used some values that are closer to the worst case than the smart people at buildingscience.com use in their Vapor Barriers and Wall Design report RR-0410. They use average high and low for 3 month periods and lower winter humidity levels. The greater the R value of the inner core of rigid foam the larger the safety margin for condensation. |
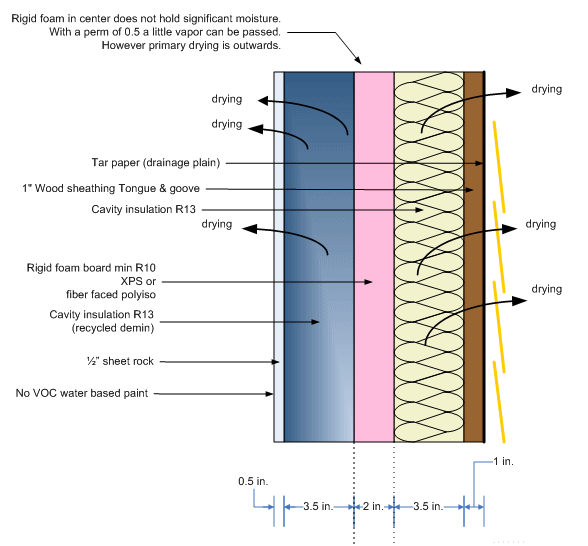
Drying abilityWalls must be able to dry out naturally; otherwise in the event of a leak the wall would have to be deconstructed. This wall primarily dries from the core outwards, both to the interior of the building and to the exterior, this is because the rigid foam board will not retain significant moisture and it is also the least permeable part of the wall (perm 0.5 for 2"). Thus excess water will leave via the path of least resistance, which is outwards. If a foam board with a vapor barrier is used, for example foil faced polyisocyanurate, then the only means to dry will be outwards, there would be no ability at all to dry across the foam board barrier. So foam board with a foil face is not recommended for this.
Interior finishIf the interior of the wall is later decorated, it would be best to use a water based (non-VOC) paint, and certainly not PVC backed wall paper, latex paint should be avoided too.
Exterior upgradesIf the exterior siding is replaced then siding with an EPS backing would be best, but nothing with polythene or foil facing unless it is highly perforated. |
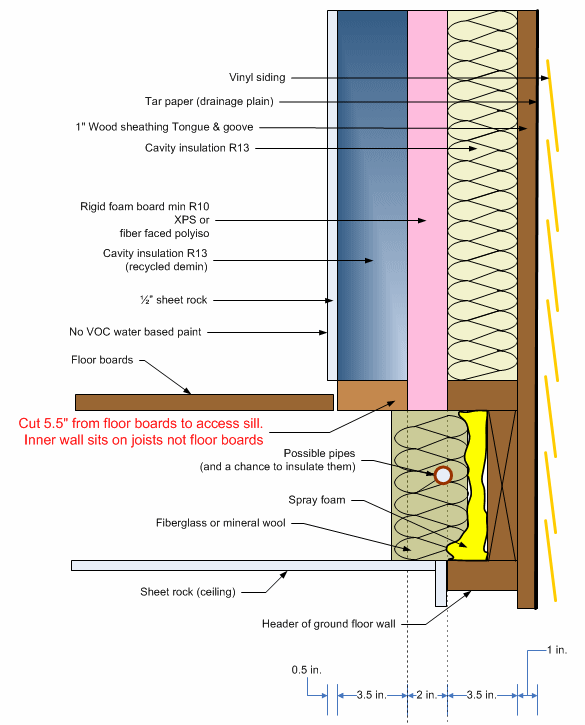
Intra-floor rim joistIn the case of a ground floor, the sill plate can be air sealed with spray foam from the basement or crawl space. However, in the case of an upper floor, this is an opportunity to air seal and insulate the space between the floor and the ceiling below. Before installing the inner wall, spray foam can be used to air seal the area inside the rim joist. Because there may be pipes in this area fiberglass or rock wool insulation can be used to pack the area around the pipes. If there are no pipes or wires here, then pieces of cut XPS can be foamed into place. Two part spray foam is quicker but more expensive and not conveniently available at big box stores. This is also an opportunity to insulate any pipes that are discovered with wrap-around pipe insulation, but in our case the pipes are no longer used and will be removed and recycled (they were from the heating old baseboard radiators). So our intention here is to cut 5.5" from the floor boards away (one board) with a circular saw. On one side the inner wall will sit directly on the joists, which makes for a stronger attachment to the structure. |

On the other side, where the wall runs parallel to the joists, if we cut all the floor boards we would have nothing to sit the inner wall on, but we could cut maybe 4.5" from just 1 in 3 floor boards to gain for access. Then the inner wall can sit on the floorboards. |
Under construction. If you have questions, please email us and we will not only answer your question, but add an explaination to this site.